Friday, November 28, 2014

Mixed Vegetable Cutlet without deep frying

                              Mixed vegetable cutlet is a perfect snack liked by everyone in my home. The beauty of the recipe is that it doesn't need any oil frying, but yet tastes delicious. It is a combination of potatoes with mixed veges. The coating made with bread crumbs, gives a crispy outside. Gives the similar taste and texture as of oil deep frying.
 
                                  An as a homemaker, the best part of the cutlet is that, the left outs of the potato masala, can be used for making mixed vegetable masala dosa. This happened in my house recently. One of my friend was to join us for evening tea, but unfortunately she did not come. So, finally the left out masala gave form to mixed vegetable masala dosa. The dosa was also yummy. 

Prep Time 20 mins
Cooking Time 15 mins


Ingredients


2 nos Potatoes Medium (Cooked and mashed)
Onion Big (Chopped)
2 nos Carrot Medium (Chopped)
6-8 nos Green Beans (Chopped)
1/4 cup Green Peas (Boiled)
1/2 cup Dry Breadcrumbs
1/2 tbsp Chilly Powder
1 tsp Garam Masala
1/2 tsp Turmeric Powder
1 tsp Cumin Seeds
2 tbsp Coriander Leaves, finely chopped
As per Taste Salt
As needed Oil for Tawa Frying

Procedure


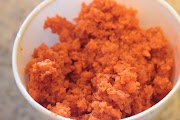
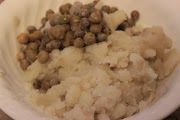
1) First boil the peas and potatoes, mash the boiled potatoes and keep aside.


2) Meantime chop all the vegetables.


3) In medium flame, put little oil in a tawa and add the vegetables one by one. Start with onion, when they turn translucent add the carrot and beans. Saute them for 4-5 minutes. 

4) Now add the sauted vegetables to the boiled potatoes and peas mixture. Add chilly powder, turmeric powder, garam masala and salt.


5) Now mix all the ingredients together and just knead it softly. With the available vegetables potato mixture, make desired shaped. 

6) Meantime, prepare the maida mixture and bread crumbs.


7) Dip the shaped potato mixture in maida batter. To make the maida batter. just add water to maida and mix well without any lumps. The batter should not be very thick.

8) Once dipped in maida batter, dip them in bread crumbs. 


9) In low flame, in a non stick tawa and put the above.

10) You can add very little ghee/oil in the intermediates. Keep turning them, so that it is not over cooked. 


                      Note:
  • Adding of onions is optional.
  • You can also add chilies, then reduce the amount of chilly powder.
                        These simple and yummy vegetable cutlets goes well with tomato ketchup, green chutney and side dish of your choice.

Saturday, November 22, 2014

Papaya and Watermelon Smoothie- Smoothie rich in Antioxidants and Vitamin-C

                             Almost in every home, kitchen experimenting starts when the kids runs out of a healthy ingredient. This happens in my home too, again with a grown up kid, my husband. Before my kid says no to a healthy ingredient, my husband stands before her to say no. I really have to think of combinations when it comes to fruits and veges. Papaya falls on the above kind.

                  The unusual odour of papaya may turn off many. But still it has good source of antioxidants, vitamin C, folate, potassium, fiber and vitamins A, E and K.The lycopene content of papaya prevents cancer too. Watermelon is also similar to papaya with lots of antioxidants and many more nutrients. Hence tried making a healthy smoothie with papaya and melon, which has no loss of fibre as well.

                                    
Prep time 15 mins
Cooking time Nil

Ingredients

1 cup Papaya (Deseeded and Chopped) 
1 cup Watermelon (Deseeded and Chopped)  
1 tbsp Honey (optional)


Procedure

1.  Leave off skin( green color). Deseed the papaya and watermelon and chop it.

2. Then in a blender put the chopped melon and papaya and blend it until smooth. Add honey also if needed.

3. Transfer it to a container. Now the papaya and watermelon smoothie is ready to be served.If necessary add ice cubes.

                              After making this smoothie, I just loved the color of it, that thinking of to buy a saree in the same color.


Thursday, November 20, 2014

Daal Palak Ka Shorba /Spinach and Lentil Soup

                              Whenever I come across Palak/Spinach, I can't restrict my mind flashing about the great cartoon character POPEYE- The Sailor Man. Unlike the kids today aware of more cartoon characters, I just remember few cartoon characters in my earlier days. Popeye is the one who lives from my childhood days. As yet, no other cartoon character is so impressive as of popeye (for myself). As of Chotta bheem's laddu, Palak/Spinach was the energy booster for popeye. Popeye will have raw spinach for his ultimate superman energy, for knocking down the mighty Bluto. 

                        Spinach has bunch of health benefits in it,in addition to the Popeyes instant energy. Travelling away from India, I could find mere greens available. Spinach (except cilantro n mint) is the one easily available. So my greens is strictly restricted to Spinach. Trying out different recipes with spinach and yielded to this healthy dal and greens combo- Spinach and lentil soup.
   
                                            My husband always stays away from the greens, that too him having a soup with only spinach will not happen in my dream too. So tried adding moong dal with spinach. Moong dal when added to any recipe it will surely give an enhanced taste, either payasam, sambar, even rice which turns to ven pongal. Yes and finally my Daal Palak Shorba/ Spinach lentil soup was made.


Prep time 10 mins
Cooking time 15 mins

Ingredients 

1 cup Spinach (tightly packed)
1/2 cup Moong Dal
1/2 tsp Turmeric powder
as per taste Pepper powder  
as per taste Salt
                     
To make Spinach Puree
1 cup Spinach (tightly packed)
1/2 tbsp Onion finely chopped
1/2 tbsp Garlic finely chopped
1 tsp Cumin Seeds

To garnish
1 tbsp Ghee
1 tsp Mustard Seeds
1 tsp Cumin Seeds

Procedure


  1. First cook the moong dal for 4-5 whistles in pressure cooker, with turmeric added to it.
  2. Meanwhile clean and chop the spinach. 
  3. In medium flame, we have to cook the spinach. In a pan put the cumin seeds, chopped onion and garlic, followed by spinach. Saute it for few minutes and then allow it to cook. The water in the spinach will itself be enough. If water is needed just sprinkle some water. Spinach will be cooked in 5-6 minutes.
  4. When the spinach is cooked, cool it and make puree out of it. 
  5. Add the spinach puree with the cooked moong dal and salt, mix it well. Cook it for 4-5 minutes in low flame.
  6. Switch off and transfer the spinach dal mixture to a bowl.
  7. In a frying pan, in low fame, add ghee. After it gets heated add the mustard seeds. Wait it to splutter and add cumin seeds. 
  8. Pour the above on the soup. Hence we are done with the soup.
  9. Add pepper as per your taste. The soup was tasty when plain even without pepper. 
                  
                     Note:
  • While making puree, you can also avoid onion and garlic. So this soup can be made by people who avoids onion and garlic.
  • Instead of moong dal, toor dal, masoor dal can also be added.
  • For onions,  I prefer shallots or sambar onion.
                            Simple, healthy, stomach friendly, diet friendly spinach lentil soup is made ready.


Thursday, November 13, 2014

Carrot Halwa Recipe without Grating /Gajar Halwa /Punjabi Gajar Ka Halwa

                       If you search for this carrot halwa in any search engines, you will find it as a popular, ultimate, authentic, unusual Indian Desert. Yes, it is and this recipe is something more special which never makes you fall down. Never mind you are new to cooking, bachelor cooking and so on, if you are going to start your first attempt with this carrot halwa, you will end up with increased confidence levels in cooking.

                           This is a special recipe to me as I made this recipe, just after my marriage for inviting my husbands friends. Being very new to cooking, my dessert recipe ended up so well that, gave me a kick start interest in cooking. The ingredients carrot, milk, ghee and sugar will make the wonders in the taste of the recipe.


                    Here again, I had no grater with me, so tried making this recipe with carrot puree. As the carrot puree was made, the cooking time was also reduced. So super yummy, authentic, heavenly Indian desert will be ready in minutes.


Prep time 15 mins
Cooking time 45-60 mins

Ingredients

5-6 nos Carrot (Chopped and made Puree) / 2 cups Carrot Puree or Carrot Grated
2 cups Milk
1 cup Sugar 
2-3 tbsp Ghee

Procedure

1) First chop the carrots and puree it in a blender or mixer grinder. If you do have grater, do grate the carrots.
In a Kadai, add 1 tbsp of ghee and saute the carrot puree or grated carrot.


2) In medium flame, after sauteing for 2-3 minutes, pour the milk. Keep on ladling in between. 
You can see the milk boiling, and keep on stirring in intermediates.


3) Once most of the milk is absorbed, add sugar, cardamom powder and keep on stirring it.
Add ghee in the intermediates. Once done you can see the halwa bubbling.


4) Yes, yummy Indian desert is ready and to be garnished with nuts and raisins. 

               Note:

  • You can also make this recipe with beetroot, which turns to beetroot halwa.
  • Instead of making puree, you can also grate the carrots.
  • This is a stove top method.


                         In just few minutes, you can make this inviting recipe.


Saturday, November 8, 2014

உளுந்தம் பருப்பு கஞ்சி

                        நான் சின்ன பிள்ளையா இருக்கும்  போது எங்க வீட்டுல இந்த கஞ்சிய அநேகமா எல்லா வரமும் செஞ்சிருவாங்க. அப்பலாம் இந்த கஞ்சிய பாத்தாலே நான் ஓடிருவேன், ஏன்னா அது வழுவழுன்னு இருக்கும். ஆனா அதோட  அரும இப்பதான் தெரியுது.

                       "ஏல அவன் தும்முறான், அவனுக்கு உளுந்தம் பருப்பு கஞ்சிய போட்டு குடுல"னுதான், எங்க ஊருல எல்லாரும் சொல்லுவாங்க. எங்க ஊருல யாருக்காச்சும் சளி பிடிச்ச இதுதான் மொதல் வைத்தியம்.

                      இந்த அருமையான கஞ்சில இருக்கிற உளுந்தம் பருப்பு, கற்பட்டி, பூண்டு, சுக்கு, தேங்கா எல்லாமே உடம்புக்கு ரொம்ப நல்லது.


தேவையானவை: 

ஒரு கப் உளுந்தம் பருப்பு 

1/2 கப் கற்பட்டி / வெல்லம் துருவியது
3-4 கப் தண்ணீர்
இரண்டு பூண்டு
1/4 கப் தேங்காய் துருவியது 
ஒரு இன்ச் அளவு சுக்கு
ஒரு கப் பால் (தேவையென்றால்) 

செய்முறை: 
1) ஒரு குக்கரில் உளுந்தம் பருப்பு, உரிச்ச பூண்டு,சுக்கு  எல்லாம் போட்டு 15 நிமிஷம் வேக வைங்க. 
கற்பட்டி அல்ல வெல்லத்தை பாகா காச்சி, வடிகட்டிகோங்க.


2) எல்லாம் நல்ல வெந்த உடனே, காச்சின பாகயும் துருவின தேங்காயும் போட்டு 3-5 நிமிஷம் மறுபடியும் வேக விடுங்க. 
தேவைபட்டால் காச்சின பாலையும் உத்தி  2-3 நிமிஷம் மறுபடியும் வேக விடுங்க.

                       கவனிக்க:

  • கருப்பு உளுந்து வச்சும் இந்த கஞ்சி பண்ணலாம்.
  • பால் சேர்ப்பதை பொறுத்து, தண்ணீ அளவை கூட்டி கொறைக்க வேண்டியதாம்.


Monday, November 3, 2014

Omapodi using omam water Recipe /Plain Sev /Spicy gram flour noodles

                         Almost during all the festivals, especially during Diwali and Pongal, I will be wholly enclosed by my family. Yes, ours is a very big family, both from my side and my husbands side. If so it is Diwali, we will be burning crackers together, go for movie and so on. Surely the head count will not go beyond ten. But this time, we were completely deserted. That too, my husband had to work on that day too, so myself and my daughter were celebrating all alone.

                                                 I was not only isolated from my family, relatives and friends, but also from kitchen utensils. I managed to make recipes barely with available forks and spoons. Luckily I had idiyappam maker with me. So tried this omapodi with the omam water, which I had for my kid. My daughter just loves omapodi, as it is not too spicy. Using omam water, gave the best result (same as the original one) and a less time consuming too. My daughter relished with my omapodi I made for this Diwali. So my deserted Diwali had some blossoms on it.


Prep Time 15 mins
Cooking Time 15 - 20 mins


Ingredients


1 cup Besan / Gram Flour/ Kadalai Maavu

1/2 cup Rice Flour
1/4 cup Omam Water /Ajwain Water
1 tbsp Butter (At room temperature)
As per taste Salt
As needed Water
As needed Oil ( For Frying)

Procedure
1) Sieve both the flours, for lumps if any. Mix the flours with salt, butter and omam water.

2) Mix all the ingredients to make a dough. Using idiyappam maker you'll have to press the dough.

3) Press the dough in the low heated oil. While pressing the dough, do not overlap. 

4) Wait till the bubble stops, then turn to the other side. Let it to cook on the other side. Once the bubbling of the oil stops, then the omapodi is done. 

5) Drain the oil using a paper towel and break the omapodi and store in a airtight container. It can be used for chat items too.

                               Note:
  • The thickness of the omapodi can be varied according to ur wish. I made it with very fine holes.
  • The oil should not be heated too much. If so, while pressing the dough, it will disintegrate.
  • The omam water/ ajwain water will be available in different brands also.