Saturday, March 29, 2014

Lunch Menu with Mochakottai Kuzhambu


              After looking into many blog's I thought that I could also post some lunch menus. For lunch I usually cook complete South Indian dishes only. That too when including kuzhambu recipes for the weekends, I have very less options. So I thought I could make the Mochakottai Kuzhambu.

           I am not a very big fan of this kuzhambu, but love the kuzhambu my aachi(grandma) makes it. I would always prefer to have pottu kadalai thuvaiyal (roasted bengal gram thuvaiyal) as one of the side dish for these types of kuzhambus.


Prep time 45 mins (except soaking the mochakottai)
Cooking time 45-50 mins 


               This menu includes Boiled Rice along with Mochakottai Kuzhambu, Chow Chow Kootu,
Pootu Kadalai thuvaiyal and butter milk.

              For kuzhambu using tamarind ( lemon sized) all kootu varieties will  be a perfect match. In my house my amma also makes keerai kadanchathu with these types of kuzhambu.

              Thuvaiyal/ thogaiyal using the roasted bengal gram , fried moong dhal will make the above combo into a great combo. Usually for these types of thuvaiyal they donot add tamarind.

Check the links for menus

Mochakottai Kuzhambu
Chow chow Kootu
Pottu kadalai thuvaiyal ( Roasted Bengal Gram thuvaiyal)
Buttermilk


Chow Chow Kootu / Chayote Kootu


                Kootu is a type of dish which I always prefer to have. Kootu is good for our stomach as the preparation consumes only less oil i.e; oil only for tempering.

               Chow chow vegetable can be used for making kootu, sambar and kurmas too. I made this kootu using channa dal so this one will be different from the moong dal kootu.


Prep time 10 mins
Cooking time 15-20 mins


Ingredients


2 small Chow chow ( or 1 big)

1/4 cup Bengal Gram (Channa Dal)
1 tsp Chilly Powder 
1/8 tsp Turmeric Powder
As per taste Salt

To Grind

1/4 cup Coconut Grated
1/2 tsp Cumin Seeds

To Temper

1 tsp Oil
1 tsp Mustard seeds
2-3 nos Small Onion Chopped
1 spring Curry Leaves


Procedure


1. First cube the chow chow after removing the skin. Then in a vessel put the cubed chow chow and add the water until the chow chow dips in and then turmeric powder. Boil it to cook.


2. Meantime cook the channa dal for 3 whistles in pressure cooker. And coarsely grind the ingredients under to grind.
When the chow chow is half cooked (takes nearly 10 minutes), add the cooked channa dal, grind-ed paste, chilly powder and salt. Put it in medium flame


3. Wait for the chow chow to get fully cooked and the water absorbed completely. Switch off and keep aside for tempering the dish. 


4. Finally we have to temper using the ingredients under to temper. In medium flame put the kadai, followed by oil. When the oil gets heated put the mustard seeds, wait it to splutter and add the chopped onion and curry leaves. Mix well and your chow chow kootu is ready.


                   Note:
  • Instead of channa dal you can also cook using moong dal. Channa dal will be a bit more dry than moong dal kootu.
  •  We can also pressure cook chow chow for 2 whistles instead of boiling.


Thursday, March 27, 2014

Gulab Jamun Recipe (using Khoya/ Kova)


                      Now a days Gulab Jamun is like a must dessert served in many functions(marriages). We can see Hot gulab jamuns served along with cold ice creams as dessert in many parties. When ice-creams are there I will never move to the second option ( I am not a big fan of gulab jamun too)
                   
                    In many Hindi serials I have seen people making these jamuns which are dark brown in colour. Tried for these dark brown jamuns(using instant mix) and resulted only in over frying of the jamuns. And finally got the secret broken by my friend Priya. The secret ingredient is khoya.

                     She used to tell me that intially she made the khoya(home made) and then the jamuns. But now she buys readymade khoya and makes these jamuns. She makes such a perfect jamuns and so I clicked when she made these jamuns. And finally sharing with you all.


Prep time 20 mins
Cooking time 20 mins


Ingredients


1 cup Khoya/ Khova (Unsweetened)
2 tbsp Maida (All purpose flour)
As needed Oil  (For Deep Frying)


For Making Sugar Syrup
1& 1/2 cup Sugar
1& 1/2 cup Water
2-3 nos Cardamom


Procedure

1) First in a wide opened vessel put the khoya and crumble it. Add the maida little by little for kneading the jamun dough.


2) Add maida and water little by little for kneading the dough. Be careful while adding water.
Knead the dough until you get oily in your hand.


3) After kneading the dough we have to make balls out of it.
Keep the kneaded dough aside for 5 minutes and then make balls out of it. While making the balls need not pressurize. By rolling smooth the balls can be made.


4) Meanwhile we will have to prepare the sugar syrup with sugar, water and cardamom. In medium flame we will have to boil for nearly 10 minutes. Switch off and set the syrup aside for putting the jamuns. The syrup will be light yellow in colour.


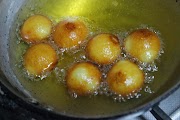
5) Next is to fry the jamuns. In a kadai add oil ( or oil+ghee) and bring the oil hot. Keep the flame in medium for frying the jamuns.
Put the balls in the heated oil. 


6) We can see the balls turning by itself after getting cooked on one side. After the balls are fully cooked put it in the sugar syrup.


Fry all the balls and put in the sugar syrup. Finally the gulab jamuns are made.


                 Note:
  • The jamuns will taste more good on the next day after getting fully soaked.
  • While frying the balls, fry less balls. Need not put more balls in the oil.
  • You can add half oil and ghee instead of oil fully.
  • If you wish you can also add rose essence finally.


Monday, March 24, 2014

Mochakottai Kuzhambu / Fried Beans Kuzhambu


                       Mochakottai Kuzhambu according to me made by my aachi(grandma) is the perfect one. For cooking the mochakottai (fried beans) she only uses mud pots instead of cooker. The cooking time using mud pots will be a little more but still the taste will be heavenly. As always cooking in mud utensils will give a added up taste from usual taste.


                     I have also read in a article that the black mochai ( black fried beans ) is good for health. Lets look into the preparation.


Prep time 15 mins
Cooking time 30 mins


Ingredients


1/2 cup Mochakottai ( Fried Beans)

Small lemon sized Tamarind
2-3 nos Small Onion Chopped
Tomato 

3 nos Brinjal (small)
2 nos Ladys finger
1/2 Drumstick
3 small pieces Raw Mango
1 tbsp Chilly Powder
1/2 tbsp Coriander Powder
1/4 tsp Turmeric Powder
As per Taste Salt


To grind

1/4 cup coconut grated
2-3 nos Small Onion
1 tsp Cumin Seeds


To Temper

1 tbsp Sesame Oil
1 tsp Mustard Seeds
1/4 tsp Fenugreek Seeds (Vendhayam)
1/4 cup Small onion Chopped
1 spring Curry Leaves


Procedure

1. Soak the mochakottai(fried beans) for nearly four hours. Cube all the vegetables. Cut drumstick lengthwise (into equal sized pieces)

Soak the tamarind in hot water. In a mixer jar put all the items under to grind and make paste.


2. Extract the juice of tamarind. In a vessel put all the vegetables (except lady finger and raw mango), grind-ed paste and the extracted tamarind juice.
Saute the ladyfinger in frying pan separately and keep aside.
Cook the soaked mochaikottai for nearly 5 whistles in pressure cooker and keep aside. 


3. In a small plate take the chilly powder and coriander powder. We have to saute the both the powders in 1/2 tsp oil.


4. Add the saute-ed powder along with the above mixture(coconut paste, tamarind juice n veges).


5. In a heated kadai add the sesame oil, after it gets heated add the mustard seeds and fenugreek seeds. After the mustard splutters, add the curry leaves and chopped small onion. Wait till the small onion turns brown colour. Add it along with the above mixture. Add the cooked Mochaikottai also.


6. Heat the above mixture and allow it to boil for 5 minutes in high flame, now add the mango and ladysfinger. Again allow it to boil for another 5-7 minutes in medium flame. Then switch off the stove. 

                  Your Mochaikottai kuzhambu is ready to be served.


                Note:

  • You can make this kuzhambu by roasting the mochaikottai also(instead of cooking).
  • This kuzhambu can be made without adding brinjal, drumstick, ladys finger, mango also. i.e; just by adding onion and tomato and mochai kottai (fried beans).
  • Sauteing of chilly and coriander powder gives a good flavor. If you feel no need to saute you can just add the powders.


Saturday, March 22, 2014

Veg Kurma / Mixed Vegetable Korma

                             
              Whenever I think about veg kurma, I can never stop my mind flashing about the veg kurma I had in Balaji Bhavan, Anna Nagar East, Chennai. I went to Chennai for my cousin marriage. Living here in Bangalore I really miss Tamilnadu food (hotel), on my stay in Chennai  I had a chance to enjoy TamilNadu food. Really had a tasty food in Balaji Bhavan. Everything served there was perfect, I became a very big fan of veg kurma served along with chapattis. So I asked for the veg kurma recipe and tried in my house with some alterations, resulted in a good taste that even my mother in law asked me for the recipe.

           The recipe is an easy one and less time consuming. Goes well with idiyappam, appam, chapattis, rotis and even with ghee rice, coconut milk rice.


Prep time 15 mins
Cooking time 20 mins                 
                       
Ingredients

1 Onion

1 Tomato
2 tbsp Chilly Powder
1 tbsp Coriander Powder
1 tbsp Garam Masala Powder
1/4 tsp Turmeric Powder
As per Taste Salt


Vegetables for Kurma

1/4 cup Green Peas
1 Carrot
5-6 nos Beans
1 Potato (medium sized)
1/2 cup Cauliflower (Optional)


To Grind


      For Ginger Garlic Paste
1 inch sized Ginger
6-7  nos Garlic Pods

     For Coconut Paste

1/2 cup Coconut Grated
1 tbsp Roasted Gram Dhal/ Chutney Dhal
1/2 tbsp Poppy Seeds
2-3 nos Cashew Nuts


To Temper

1 tbsp Oil
1 inch sized Cinnamon
2 nos Cloves

For Garnishing

1/2 tbsp Coriander Leaves
1/2 tsp Garam Masala Powder (optional)


Procedure.


1. First cube all the vegetables and make the paste of ginger garlic.


2. Then make the coconut paste using the ingredients under for coconut paste. The paste should be very smooth.


3. Heat oil in cooker, add cloves and cinnamon followd by chopped onion. Saute it till it turns transluscent, then add the ginger garlic paste. Then add the tomatoes and saute for 2 mins.

4. Now add all the cubed vegetables and add 1 cup of water. Let it boil for 2 mins. Add the powders Chilly powder, Coriander powder, Turmeric Powder and required Salt.


4. Now close the cooker and wait for 2 whistles. After two whistles turn off the stove and wait for the steam to escape.

5. Open the cooker, add the grinded coconut paste and the garam masala powder. Allow it to boil (in simmer flame) to reach the thick kurma consistency. 

6. Once done switch off the stove and garnish with coriander leaves. While garnishing I usaully add 1/2 tsp of garam masala powder to get a good flavor. 


                   Note:
  • You can also cook in a kadai, instead of cooker. Using cooker will consume less time.
  • While sauteing the ginger garlic paste i usually add a pinch of salt so that it will not be so sticky.
  • You can also add green chilies, if so you add reduce the chilly powder a little. 


Friday, March 21, 2014

Idiyappam (String Hoppers)


                  Idiyappam is one of my most favorite dish. I am always a very big fan of Kerala food recipes. When working in Techno park in Trivandrum ( Kerala) I just enjoyed the food served in that PG ( paying guest). Idiyappam is a famous food of Tamil Nadu, Kerala and Sri Lanka too.

               My amma(mother) is a very big expert in making idiyappam. She makes such a soft idiyappam ( it will just melt in mouth). Whenever we have guest in my house she will just make these idiyappams so easily and very fast and served along with coconut milk and veg kurma. I am a very big fan of her always as all.

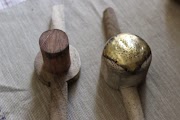
            For making soft idiyappams we have to add hot water for kneading the flour. For making these idiyappams there are many types of the idiyappam makers available nowadays. Here I have displayed the basic types of idiyappam makers.


Prep time 15 mins
Cooking time 20 mins                 
                       

Ingredients


2 cups Rice Flour

2- 3 cups Water 
As per taste Salt


Procedure


Images of Idiyappam Maker.


The wooden one(first) is press type and the metal one (second) is screw type


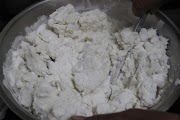
1. First in a wide opened vessel put the rice flour. In another vessel pour the water along with salt and boil the water until it is rolling hot.


2. Then pour the hot water little by little and mix along with rice flour for kneading the dough. While kneading the dough use the back portion of ladle(the stick like) instead of front one, so that the kneading will be easier. Knead the dough until they become soft.


3. Take small portions of kneaded dough in the idiyappam maker and press it onto the greased idli moulds.


4. After pressing the dough in the idli mould close the idli cooker and let it cook in high flame. Your idiyappam will get cooked in less than 10 minutes (say 8 mins). Then transfer the cooked idiyappam into another vessel and continue the process of making idiyappams again.


                            Note:
  • Good quality and well roasted rice flour will give soft idiyappams.
  • After kneading the dough close the dough with a moist cloth so that the dough will not turn dry.
  • How to check the idiyappam is cooked? 
  •                            Take a spoon, dip the spoon in water and then poke the idiyappam, if cooked it will not stick on the spoon.


                          This idiyappam goes well with coconut milk, veg stew, veg kurma . I love eating these idiyappams simply by adding grated coconut(fresh) and sugar.